[English] Tutorial how to unbrick and upda...
 Jurij
12 May 2014
Jurij
12 May 2014
Hello,
Today i will show you how to unbrick your Sony Xperia Z1 C6903 and update boot. Sony Xperia Z1 C6902 is currently not supported. Sony Xperia Z1 smartphone can be bricked during firmware flash to version 14_2_A_0_290 or newer using obsolete Flashtool (Version older than 0.9.13) or other third party tools.
If after flash your phone is dead and you have warranty - send your phone to Sony - you will get new phone.
If after flash your phone is dead and you do not have warranty, this tutorial is for you. Remember, during this process you can damage your phone, everything you are doing on your own risk. For 99% your phone will not be 100% functional, for example it will not be waterproof anymore if you will disassemble or reassemble it improperly.
Bricked phone symptoms:
- can't power on after flash,
- no lcd or led reaction for power button,
- no lcd or led reaction for charger,
- no lcd or led reaction if phone is connected to PC,
- your PC can't detect your phone with vol-,
- phone does not vibrate when holding vol+ and power together.
Your phone is bricked after flash, because your flasher did not updated boot in your Xperia Z1 smartphone during flash, what is required when flashing 14_2_A_0_290 firmware or newer. Let's fix that.
1. First step is very difficult, you must disassemble your phone, remove back cover and get access to the main board. Please download Sony Xperia Z1 service manual from our forum: http://sony.yt/topic...kcja-serwisowa/ and read working instructions carefully.
2. Download and install the latest Gordon's Gate Flash Driver from this post:  ggsetup-3.0.0.7.exe 3.58MB
14086 downloads
ggsetup-3.0.0.7.exe 3.58MB
14086 downloads
3. Remove battery from your phone and localize testpoint on your main board (it's marked with red arrow):
 c69xx.jpg 143.25K
209 downloads
c69xx.jpg 143.25K
209 downloads
Using paperclip or testpoint wire connect this point to GND (for example metal shield or sim card holder) and attach USB cable. Your computer should detect SEMC Flash Device in device manager. If yes, disconnect your phone.
Hint: Now you can enable emergency mode in your phone, so next steps will be easier to do. To do that remove battery, connect testpoint to GND, insert battery, press power on button, disconnect testpoint. Now your phone is in emergency mode.
4. Download and run this s1tool:
s1tool 6II2015.exe 3.12MB
3496 downloads
5. Download proper APPSW firmware for your Sony Xperia Z1:
For C6903:  C6903.rar 19.34MB
2438 downloads
C6903.rar 19.34MB
2438 downloads
6. In S1tool choose MSM8974 emergency mode, press Flash button, select correct APPSW .sin_file_set file (or you can select whole firmware if you have it in order APPSW, FSP, Elabel - but you can't use .ftf flashtool files),
7. Press Testpoint READY button:
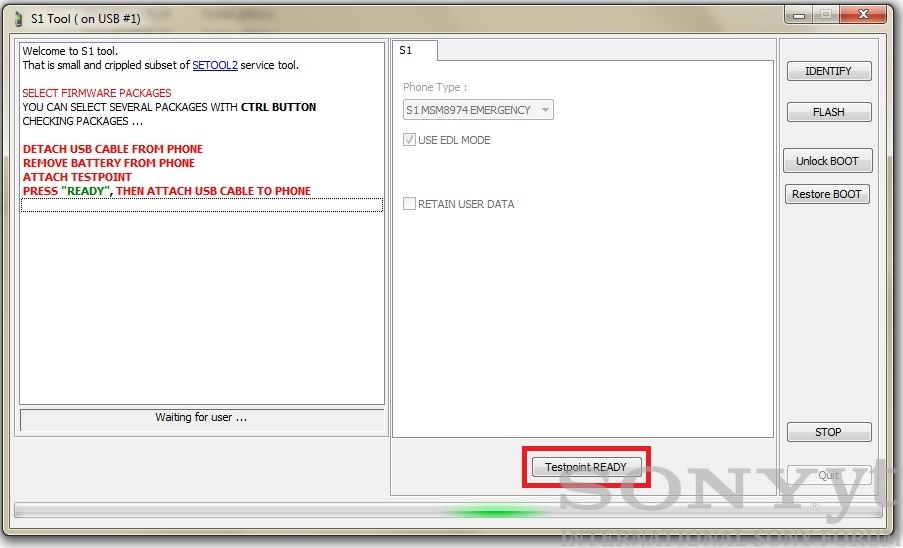
and if your phone is in emergency mode, just attach usb cable. If not, perform all steps from point 3 (connect testpoint to GND and attach USB cable).
8. When drivers will be installed and phone will be detected, program will ask you to disconnect testpoint. If your phone is in emergency mode, just press Testpoint READY button. If no, disconnect testpoint from GND and press Testpoint READY button.
9. After that phone will load emergency s1 loader, re-enumerate usb, load s1 loader, update boot in your phone and flash selected firmware. When it's done and you have flashed all firmware parts (APPSW, FSP, ELABEL), phone will be fixed. If not, you must reflash it fully with Sony Update Service, Sony PC Companion or any other flasher like current Flashtool version or this S1tool.
10. Time to reassembly your phone using service manual: http://sony.yt/topic...kcja-serwisowa/
Now your phone should be alive  But if you will see message:
HARDWARE ID : XXXXXXXXXXXXXXXX not supported
Bad luck, your phone can't be fixed. My suggestion: search for working Xperia Z1 with broken lcd and swap main board.
Credits: Big thanks to mr the_laser for creating this fantastic software and solution and thanks to myevilface from support.setool.net for finding Sony Xperia Z1 testpoint 
Best regards,
Jurij
6 II 2015 update: Updated s1tool version to the latest available dated on 6 february 2015. Added support for C6903 prototype phones.
Tutorial worked out for Sony.yt forum - copying is prohibited.

Jurij
09 Feb 2015
New version of s1tool is available from the_laser:
s1tool 6II2015.exe 3.12MB
3496 downloads , first post is updated. What's new in s1tool dated on 6 II 2015? Addes support for C6903 prototype phones
 makabress
21 Feb 2015
makabress
21 Feb 2015
hi
thank you for this tutorial but not working for me
it stop at waiting for phone... nothing happen
tested with xp 32 and 64 and seven 64
instaled all driver
trayed with two different original sony usb cable
trayed with usb 1 usb 2.0 usb 3.0
thank you for any help
Jurij
22 Feb 2015
Does any device shows up in device manager when you connect testpoint and usb cable? Try the latest s1tool version:
s1tool 6II2015.exe 3.12MB
3496 downloads If your phone is C6902, it's not supported.
makabress
22 Feb 2015
hi
it show semc flash drive
and tested with s1tool 6II2015.exe it's the same problem
but im not sure it's a c6903 or c6902 i have a working c6903 it's green pcb and the one that im traying to repair is blue pcb but have exactly all the composant of the c6903
so how can i identify if its a c6903 or c6902 ( i have only the pcb)
Jurij
22 Feb 2015
So analyse imei number. For example TAC 35809405 belongs to C6902. But it's strange, it looks like program is waiting for a phone. Maybe in second step try to connect battery after making testpoint and before pressing ready button...
makabress
22 Feb 2015
trayed , but same problem
when i push ready button i get the sound of removing usb nothing more it's look like that it can't reboot by it self
i supose this is very hard brick
Jurij
23 Feb 2015
This is the oldest s1tool you can try:
s1tool.exe 2.03MB
1678 downloads . If that will not help, i can't advice you nothing more than to buy working xperia z1 with broken lcd and swap main board...
Jurij
23 Feb 2015
Are you sure that during repair procedure all programs from Sony and other flashers are disabled? Also in tray (near system clock) please make sure that all PC Companion and other programs are closed.
makabress
24 Feb 2015
yep trayed with fresh windows xp sp3 32 bit fresh instalation with only driver instaled on it
same problem
the problem is the phone can't reboot by it self after click ready
Jurij
24 Feb 2015
I would try to change testpoint wire and search for a different testpoint If you have time and nothing to loose... it's worth to try
makabress
24 Feb 2015
makabress
24 Feb 2015
Tested all point and get different error like
DLOAD PROTOCOL AND get error after this
or usb#?... error
i will copy the logs later
Now i have to retest with atached battery
do i have to use emergency mode only or i can use flash mode?
Jurij
24 Feb 2015
It's written in first post how to find testpoint. Connect each golden point to gnd (metal shield for example) and attach usb cable. When you will see new device in device manager - that's it. Then you can use emergency mode to flash your phone. You can test all golden points one by one.
